This is a guide which shows you how to install Xampp on Windows 7 64 bit.
Visit apachefriends.org to get the Xampp distribution for Windows. I prefer the non-installation zip file so let’s get this one. The zip or 7zip files are the same but you’ll need another zip utility such as 7zip or WinRar to unpack the 7zip archive. If in doubt, get the zip as Windows can extract files from this one.
Unpack the zip file onto your hard drive. My test PC was partitioned into C and D so I unpacked the file to get this structure:
d:\xampp
You can likewise use your C drive, just replace D with C in all my examples. I prefer a separate partition so that a Windows reload would not wipe these files and since it’s a standalone installation, a new Windows install would allow Xampp to work with no configuration.
Next, we should now be able to run the Xampp control panel by navigating to the newly created xampp folder in My Computer, then double clicking this file:
d:\xampp\xampp_control.exe
If this is not visible, there is an icon in the system tray (bottom right of the screen) that will pop the Xampp Control Panel up again. You may need to use the arrow to expand the tray icons and make it visible. At this point I usually make the tray icon always accessible by dragging it to the visible tray area.
Tick the svc boxes under MySQL and Apache and click the Start button on both. You now should have both services report that they are running
Apache runs and then stops again in Xampp
Xampp and Skype – arch enemies
After a lot of testing I came to this conclusion…. they both hate each other! They are fighting for attention on port 80. Now we can either make Skype dump data on another port or, and I believe this to be the better way, close Skype while we are working in the Xampp environment. Given that there is a bug in Skype on Windows 7 where it is always displayed on the taskbar, even when closed or signed out, you will need to completely close Skype in Windows 7. The solution and quickest way is to right click on the Skype icon on the taskbar and click on Quit. This stops Skype from monitoring port 80.
Other offenders can include TeamViewer, UVNC, Crossloop and LogMeIn if they are set to be resident. Simply quit these applications to avoid conflicts.
OK, let’s push forward and check we now have Apache and MySQL running by firing up Xampp’s information page. In your browser’s address bar, type in:
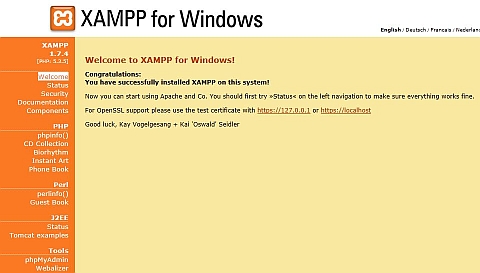
This should give you this Welcome and Information screen:

In this screen there should be a page with a column of options down the left side. Now depending on your screen size and whether your browser has toolbars installed, you may miss the bottom few lines. On our test laptop with a 15.4″ screen this missed the last few rows.

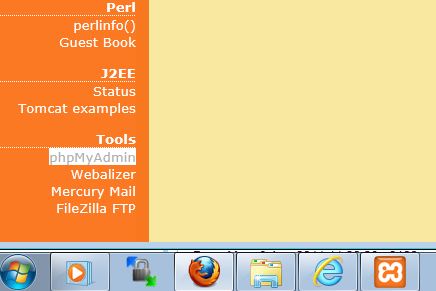
No problem though, we can disable the toolbars temporarily or just type in the browser command we require. Here you can see the last entry for reference:

Right, so we can now setup WordPress as all we require is Apache and MySQL to simulate our server.
Setup WordPress in Xampp
We are going to use phpMyAdmin to create our database that WordPress will run on. On the Xampp info page, click on the menu item ‘phpMyAdmin’ OR in your browser go to
Note I am using forward slashes here but if you use backslashes it will resolve to the same place. Best to use Unix server syntax though as it’s great practice if you are a Windows user wanting to do things correctly! It will stand you in good stead if you need to get your hands dirty on a real server.
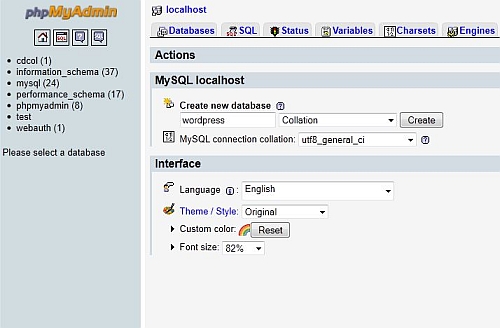
Okey dokey, let’s setup WordPress’s database. Under MySQL Localhost, type in “wordpress” as the database name. Check your options are as shown below:

If you are seeing a slightly different screen to the one above, this is because you’ll be running a later version of phpMyAdmin. No problem, the important thing to make sure you get right is the utf8_general_ci and the name of the database. The name of the database can be anything really, just don’t use special characters. I often use the name of the domain I am developing.
Let’s move on to WordPress now. Download the latest and greatest version from here and unzip it to your desktop. You should now have a folder called wordpress. Open this and look for the file
wp-config-sample.php
Look for the following lines
/** The name of the database for WordPress */
define('DB_NAME', 'database_name_here');

/** MySQL database username */
define('DB_USER', 'username_here');

/** MySQL database password */
define('DB_PASSWORD', 'password_here');

/** MySQL hostname */
define('DB_HOST', 'localhost');

/** Database Charset to use in creating database tables. */
define('DB_CHARSET', 'utf8');
Carefully edit the lines to read this:
/** The name of the database for WordPress */
define('DB_NAME', 'wordpress');

/** MySQL database username */
define('DB_USER', 'root');

/** MySQL database password */
define('DB_PASSWORD', '');

/** MySQL hostname */
define('DB_HOST', 'localhost');

/** Database Charset to use in creating database tables. */
define('DB_CHARSET', 'utf8');
I’d advise you stick to this because in Xampp, ‘root’ is the default user and there is no password. Note that I only modded 3 lines, I just left the last 2 in for info as some people change these unnecessarily. Now save this file as wp-config.php in the same wordpress directory (it will not work if you just save it as wp-config-sample.php!)
Copy the whole wordpress folder over to the xampp htdocs directory so you now have
d:\xampp\htdocs\wordpress
Developer tip:
If you are setting up Xampp as a test environment for building client websites, use the name of the client or their domain instead of ‘wordpress’ as a folder name. At this point, you can copy the folder to another within htdocs and rename it to something else, ready for your next project,eg:
htdocs\domain1
htdocs\domain2
Navigate in your browser to
https://localhost/wordpress/wp-admin/install.php
and you should see the WordPress installation routine. Choose the following:
Site name: TESTSITE
Username: abc
Password: abc
Untick the “Allow my site to appear in search engines…” box
Add any email address
Click “Install WordPress”
At the ‘Success’ screen, login with username: abc and password: abc
You can now login at any time that xampp is running Apache and MySQL by going to this url in your browser:
https://localhost/wordpress/wp-login.php
Congratulations! You can now modify your WordPress theme files directly in the WordPress themes folder (wp-content/themes/theme-name) and refresh your browser page for quick and easy theme or template development with no FTP! Once you have modified your files, then you can save them elsewhere as a backup and upload them to your server.

my php admin page looks different. i don’t know where i can find the text fields for “create new data base” and im using XAMPP version 1.7.7
Since I too installed via .zip in D:, I had to run “setup_xampp.bat”, otherwise the MySQL service refused to start. This is using Windows 7 MCE x64/XAMPP 1.8.1. Not sure if this applies to any other OS’es or XAMPP versions.
Great explanation thanks, got it up and running now. Xampp is really great for developing on!
thank you xampp installed successfully as per steps