How to clear the DNS cache

clear dns cache mac windows

Your DNS cache stores IP addresses of webservers. These servers have delivered pages which you and others have recently viewed. If the location of the web server changes for any reason before the entry in your DNS cache automatically updates, you will find yourself unable to access the website. You may also see a lot of 404 error codes, which generally happens when your DNS cache is messed up.

This is particularly prevalent for Webmasters who are setting up a new website and suddenly get presented with an old page or no page at all. Often it is visble on another computer or mobile phone which makes it even more frustrating.

By clearing this DNS cache, your computer will then re-query the nameservers for the new DNS information.

How to clear your computer’s DNS cache in Windows 2000, XP, Vista, 7 or 8

  • Click the Start button
  • On the Start menu, click Run
  • If you do not see the Run command in Vista/7/8, enter “run” in the Search bar just above the start orb
  • Type the following in the Run text box: ipconfig /flushdns
  • Press Enter

Pay attention to the space between the g and the forward slash.

Close the command window and retry your browser.

How to clear your computer’s DNS cache in Mac OS 10.7 onwards

Please note that for this to work you require the Admin account password.

  • Click Applications
  • Click Utilities
  • Double click the Terminal application
  • Type in: sudo killall -HUP mDNSResponder

Close the terminal window and retry your browser.

How to clear your computer’s DNS cache in Mac OS 10.6 and below

  • Click Applications
  • Click Utilities
  • Double-click the Terminal application
  • Type in: dscacheutil -flushcache

That’s it and you should now be able to fire up your browser and get a fresh version of the page.


How to make WordPress secure

Want to make WordPress secure? Then let’s harden it now! OK this is going to be a long article that I’ll add to as “best practice” changes with new releases.  For starters, let’s clear up what I’m trying to teach.  What we are doing here is limiting access by people who are trying to compromise your WordPress installation. And they are out there, believe me.

So first off, the easy stuff….

  1. Keep your WordPress and Plugins updated. You can lock down WP all you want but if you have a dodgy plugin you could be wide open to the world.
  2. Keep your server up to date. Vulnerabilities in older versions of php and various scripts mean that an attacker could get in outside of the WordPress installation.
  3. Shared hosting. I personally don’t use this as it can severely compromise security. Even if you do all the locking down possible, someone else may leave wide-open gaps on the server.  If you want reliable VPS hosting I recommend taking a look at  Servint dedicated and VPS hosting.
  4. Use a decent antivirus and antimalware on your own PC.  The largest amount of compromised servers come from password attacks and if you have malware on your PC that gets your FTP password then it’s ‘Game Over’. Use Kaspersky and MalwareBytes for a great solution.
  5. Choose strong passwords. Never underestimate how easy most passwords are to crack with a computer. Passwords such as “Password”, “abc123”, “Letmein” are crackable in minutes. Pets’ names, people’s names, car names are all easily guessable too. Consider putting non-alphabet characters in there too such as $ or !


WordPress file permissions

Now let’s move on to WordPress file permissions.  These are most people’s nightmare but it doesn’t have to be difficult.  All files should be owned by your account and writable only by you. For directories, if you use SuPHP on your server (and I recommend you do) they should all be 755. If not using SuPHP then follow these rules:

  • /wp-content/plugins/ These are the plugin files. All files should be writable only by your user account.
  • /wp-includes/ WordPress’s ‘logic’ files.  All files should be writable only by your user account.
  • /wp-content/themes/ Your theme files. If you want to use the built-in theme editor, all files need to be group writable. If not, all files can be writable just by your user account
  • /wp-admin/ This is the WordPress admin area. All files should be writable only by your user account.
  • /wp-content/ This is for your content which should be writable by everyone (owner/user, group, and public)

For other directories under /wp-content/ you should read the relevant plugin or theme documentation.  Err on the side of caution here though, locking down first and working backwards to release permissions where required.

For novices looking for a quick guide, if you are not using SuPHP then do this:

Set all directories to 755 and all files to 644.  If you are on a shared-server, set your wp-config.php to 750 so no other user will be able to read your database username and password!


From WordPress version 2.7, there has been the facility to automatically update the WordPress installation.  It is remarkably stable and well tested so I recommend this is used.  The great thing is that after the update, all files are set to 644 and all directories to 755  and writable by only the user.  They are still readable by everyone else, including the web server.

This now leads us on to ‘security by obscurity’. In other words, making the default stuff different so attackers spend more time at the first hurdle. Here are my top tips for quick and easy fixes.

  1. Stop showing the WP version you are currently running. Why? Well, if you are running an older WordPress version with a known vulnerability then you effectively display this to the world. There are numerous plugins to do this for you but you can simply add <?php remove_action('wp_head', 'wp_generator'); ?> to your theme’s function.php file. Note that there are other ways of finding out the version that a WP website uses but this works well to hide the obvious.
  2. Rename the admin account. I do this on a new install from within Fantastico but you can also create a new Administrative account from WordPress’s back end and delete the default admin account. You will get prompted to pass ownership of all the deleted user’s posts to the new Admin which is recommended.
  3. Change the WordPress database table prefix. A lot of the  WordPress-specific SQL injection attacks assume that the database table prefix is “wp_” , so changing this blocks many (but nit all) SQL-injection attacks.

Finally, 3 words I can’t stress the importance of……Backup, Backup and Backup.  Don’t hesitate to make this a priority. For a complete backup AND a brilliant way to clone your entire site check out the excellent WP-Twin WordPress Clone Software. This not only creates a FULL backup of WordPress’s database, but it backs up all other files and folders for you. It will enable you to move your installation across servers too, something most backup software won’t do. Most blogs can be completely cloned and backed up in a few minutes without any technical knowledge.

Good luck and hope this helps you to make WordPress secure.


Online backup and coupon code for 20% off Mozy

Mozy online backup discount coupon codeOnline backup just got a whole lot cheaper with the latest coupon code from Mozy.   Click the link below and type in the coupon code ENCRYPTION for 20% discount:

Mozy online backup coupon code

Note: Enter the code into the promotional code box at signup to get the full discount.


Other recent contenders for our recommended backup software:

Crash Plan


Get more space on Dropbox

Here’s a great way to get more space on Dropbox, the free secure online file storage service.

Recently, Dropbox offered an increase to customers who used the Camera Upload facility. This method takes advantage of their generous offer and allows you to use that free space to the maximum.

First, if you haven’t got this great free online storage tool then click here to download it with a free gift of extra storage from me!

Note down your current Dropbox allowance by left clicking once on the tray icon (eg 1GB% of 2.5GB used). Don’t skip this step.

Copy 2.5 GB or more of video files to a pen drive or external hard drive. Don’t try to just copy to a folder on your PC as this won’t work!  You can use photos (or even a combination of photos and videos) but lots of small files take much longer to upload. Try to avoid a single movie that is very large, eg 3.5GB as syncing this is often flaky. If you’re in a hurry, increase your syncing speed by right clicking the tray icon then Preferences > Bandwidth and select ‘Don’t limit’ on both upload and download speeds.

Switch off other Dropbox devices that sync, just use one PC.

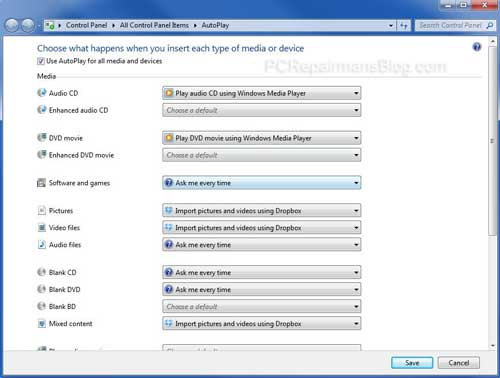
Put the pen drive in, allow the Dropbox pop-up import box to show. If it doesn’t show, select it from the Windows autoplay box. Note: if autoplay is not enabled, click on Start > Windows > Type “autoplay” and click the Autoplay link in the panel above at the top. You should set “Import pictures and videos using Dropbox” in the following fields as shown:

Windows autoplay Dropbox


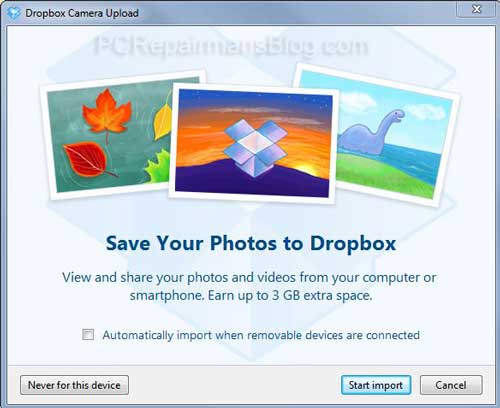
Once you see the Dropbox Camera Upload box, untick the ‘always do this’ box (IMPORTANT if you are not interested in always using the feature).
Import to your Camera Uploads folder in Dropbox.

Dropbox camera upload

Let the import finish, syncing starts immediately. Note this may take several hours or days depending on your connection speed! Watch your allowance go up to 3GB more than you had before (eg 4GB% of 5.5GB used).
Delete the files if you want to, but leave 1 in there. Rinse and repeat using the same pen drive for any other Dropbox accounts, family or friends. Rename a few files and swap one each time just in case. Now you have extra space and can use it whenever you want.


Dropbox free space FAQ

Why copy 2.5GB not 3GB of files to Dropbox?

This is because Dropbox currently give you 0.5GB for using the Camera Upload feature and 0.5GB for each further 0.5GB of files that you copy over.

What about Dropbox’s upload and download speed settings that I changed?

Change them to whatever you are comfortable with. If you have a slow connection then limit it to 50kB/s download and 10kB/s upload, otherwise don’t limit it.

Does this work on the iPad/iPhone?

Sure does. Download the iPad and iPhone app here. This link takes you directly to the App Store and allows you to download the free Dropbox app. Once installed, any future camera photos and videos will be seamlessly transferred to secure online storage. Dropbox is indispensable for the iPad and you can use it to upload files (including movies) to the iPad too, without iTunes!


Final thoughts

If your friends don’t have Dropbox then please point them to this article and get them to use my download link above to say thanks. Dropbox is a great tool and has been completely stable on my systems and client systems for many years.


Prevent scheduled disk check in Windows Vista

Occasionally you may need to prevent a scheduled disk scan in Windows. This occurs during the reboot phase and can take a long time, sometimes even an hour or more depending on drive size and data contained on it. Once started it can’t be stopped. Turning the power off can cause corruption to the hard drive.

Here’s the answer to prevent it from occurring on restarting the PC:

Open the command prompt with administrative privileges (Type “cmd” in the search box in the Start Menu, then right click cmd.exe in the search results and select “Run as Administrator”)

Type “chkntfs /x c:” (where c: is the drive letter of the hard drive you wanted to scan).

This will cancel the scan and allow a speedier reboot.


Could not start the Task Scheduler service Error 1717: The interface is unknown

This error occurs when the event log service is turned off (set to manual or disabled).  To correct, do the following:

Start, Run and type in “services.msc”

Go to the “Event log” service and double click on it.

Set it to “Automatic” and click on OK.

Now you should be able to set the “Task Scheduler” service to automatic without error.  OK your way out of all boxes and close the services window.


Stop 0x0000007b loading recovery CD

Stop 0x0000007b while loading the Windows CD Rom or recovery disk

Wish I had a penny for every time I’ve seen this one. Quite common on Dell PCs when trying to load the Operating System again, this error can be easily solved.  Boot into the BIOS (press F2 on startup on most dells, other PCs may require Del, F1 etc).  Once in the BIOS, navigate to ‘Drives’ and change the SATA operation from “RAID Auto/AHCI” to “RAID Auto/ATA”.  Save and exit setup.  On reboot you should be able to load the installation disk.

I’m seeing more and more boot sector viruses these days.  The symptoms can be similar and give the exact same stop errors.  An MBR fix can repair these but sometimes it is easy enough to pull the drive out and mount it in our test rigs, giving it a full scan for Viruses, Trojans, Spyware, Rootkits etc.  Data recovery can be done at the same time so it can be quicker if you have a spare PC to do it this way.


Bootmgr is missing

Windows 7 BootMGR fix

If you get the error BootMGR is missing when trying to load a Windows based PC then you need to follow some logical steps to find the solution.

First and foremost, I would try a startup repair using the Windows installation CD/DVD.

How to Boot to the System Recovery Options in Windows 7

Insert the Windows 7 installation DVD or System Repair Disc into the DVD drive and restart the computer

Check to make sure that you set the BIOS to have the DVD drive listed first in the boot sequence

If prompted, press any key to boot from the Windows 7 installation DVD

Select your language preferences and click on Next. (See screeshot below).

Click on Repair your computer

Select which operating system you want to restore (your own Windows 7 should be listed) and then click on Next

NOTE: If Windows 7 is not listed here or it is blank, then it is ok to proceed. In this case, still click on “Next”

Select the system recovery option you want to do. Those listed are:

  • Startup Repair
  • System Restore
  • System Image Recovery
  • Windows Memory Diagnostic
  • Command Prompt

We want “Startup Repair”. Allow Windows to find the issue and restart the PC.


Do the above without a disk, using the manufacturer’s system recovery partition

If your computer has a system recovery partition then follow these instructions.

Start the PC and tap the F8 key on your keyboard about every half a second. You should see a boot menu, if not try to do this again.

Select the Advanced Boot Options screen (if you dual-boot) otherwise ignore this line.

Using the cursor keys (arrows), select “Repair your computer” then press Enter

Select your keyboard and language preferences then click on “Next”

Select your user name and type in your password, and then click on OK.

Select “Startup Repair”

Allow Windows to find the issue and restart the PC.


If you want to find out more about the system recovery options in Windows 7, take a look at this Microsoft article:
https://windows.microsoft.com/en-us/windows7/What-are-the-system-recovery-options-in-Windows-7

If this helped you to fix your PC then please click on one of the social buttons below to help others too.


Web hosting with ServInt – setting up a VPS account

Here’s how to Setup a VPS on Servint, a quick review and some discount coupon codes.  I have also provided information to help you avoid any pitfalls. All links open in a new window so you can compare them.

First off, decide which account is right for you.  If you’re likely to run several websites then a VPS account makes sense.  I have outgrown so many hosting accounts, I wish someone had guided me in the right direction from the start.  It seems like a lot of money at first but when you consider most people don’t want to hang around to wait for your website to load it makes sense.  If you sell anything through your website (including promoting affiliate goods) you will probably recoup the extra cost through the visitors you keep.

ServInt run 3 VPS accounts,click on “Enterprise VPS” from their homepage to see the options.

At time of writing they are called Essential, Signature and Ultimate.  Essential will give most people good speed running on a very useful 768MB of RAM.  This will also allow up to 1.5GB burst RAM, good for those with sudden heavy loads.

A generous 50GB storage is allowed and 1TeraByte of monthly transfer should be ample for all but the heaviest sites.

Here’s the spec as we reviewed their service:

  • 50 GB Storage
  • 1 TB Monthly Transfer
  • 768 MB Guaranteed (1.5 GB Burst RAM)
  • Hardware RAID 10
  • CentOS 5 Operating System
  • 4 IP Addresses
  • Fastest drives in the industry
  • Unlimited Domains and User Accounts
  • FREE cPanel, Plesk, or Parallels SBP
  • FREE Virtuozzo Power Panel
  • FREE Daily Off-Server Backups
  • No Setup Fee
  • $49 Monthly

Now we used a Servint discount coupon code [ 50×3 ] to drop 50% off the first 3 months hosting and also opted for paying 12 months up front.  This resulted in a large $124.95 discount, making this one of the most affordable VPS solutions out there.  Even without the discount it is very competitive.

Support

ServInt are pretty well known for excellent support.  It’s something to consider carefully and for each hosting account I have ever used I have always done my research.  What’s the point of having a great server that doesn’t work more than 99% of the time?  With ServInt’s 24/7 support and their very good knowledge of real-world issues you shouldn’t ever have serious problems.  Some of my previous hosts didn’t get involved in database issues for example where ServInt do.

Backup

All sites require a backup plan.  ServInt’s free backup is not to be sniffed at as many hosts levy a charge for this which increases with the number of site backups you do.

Migration

If you already run a server then ServInt can help you to migrate your websites over.  It makes it easier if you run similar control panels, eg CPanel to CPanel is easier than Plesk to CPanel.

Cancellation

I like the fact that you are billed monthly and can cancel the contract with 30 days notice, beware others who tie you in for long periods as there’s nothing worse than a bad host that you can’t change from.

“What you put on the server is your responsibility and if it doesn’t work it’s up to you to put it right”.  Yeah, right.

There is a degree of responsibility, sure, but what I want is a host that works with me to resolve any issues.  Migration, bespoke scripts not working, installing extras on the server…. these are all part and parcel of running a modern website now.

Anyway, my experience with ServInt has been nothing less than pleasurable and I’d recommend them without a shadow of a doubt.  Here’s my final bill for the VPS package signup:

Your Order Total
Base Package Amount:$588.00
Immediate Discount:– $73.50
Sub Total:$514.50
12 Months Prepay Discount:– $51.45
Sub Total:$463.05
Monthly Options:$0.00
Yearly Options:$12.00
Setup Fees:$0.00
Total Due:$475.05
You Saved:$124.95

Speed tests

We tested against similar VPS hosting on 1and1, GoDaddy, 34SP and Hostcolor.  Our pretty exhaustive site speed stats showed significant speed improvement over all hosts.  The nearest competitor was Hostcolor at around 12% slower on average page loading speed.

Summary

All in all, ServInt are a very respectable hosting service provider that delivers its promise of good, fast hosting and excellent 24/7 support.  We’d recommend them highly to anyone who has more than one website, developers, resellers and owners of larger/more resource-hungry sites.

Other discount codes we are proud to be able to offer are:

Servint Dedicated Server discount coupon code – Click the link and type in 50×2 to get 2 months at 50% off.

Servint Super VPS discount coupon code – Click the link and type in 50×3 to get 3 months at 50% off. [Update – if this doesn’t work, use WHTFALL to get 50% off month 1]

Here’s a link to their current packages: ServInt VPS hosting

Update – 13 months on and we have had not a single outage or slowdown on this server. It is as robust as they come and the tech support for adding modules and recompiling etc has been brilliant with most tickets answered in an average of under 2.5 minutes.


Setting up shared folders in virtual box

Here’s how to setup shared folders on a VirtualBox installation. I’ll take it one step further and map it to a drive that reconnects on logon, forcing it to be a persistent share.

First, setup guest additions with “Devices”, “Install guest additions”

Now share a folder on your host PC or Mac. Do this by creating a folder anywhere you like (let’s call it “vbshared”) and giving it at least read permissions. Read/write is fine too.
On Windows boxes, make sure that everyone has access, this can be locked down later if required.

Now we go back to VirtualBox and do “Devices”, “Shared folders” and under machine folders we add the one we just setup (vbshared). Tick “Make permanent” and OK both windows.

Now we’re going to restart the host PC, restart the VirtualBox (don’t just fire up a snapshot) and if the image is a Windows one, open up Explorer. In the address bar at the top, type in:

\\VBOXSVR\vbshared

Press enter and you should see it pop up. Now we can map it to a drive by “Tools”, “Map network drive”, select a drive (eg z:) and retype the \\VBOXSVR\vbshared
Tick “Reconnect at logon” and there you have it, a working shared folder that maps to a drive and reconnects at logon!

For Linux machines, reinstalling Guest Additions often makes the share work afterwards.