Market Samurai review with current discount code and money off

market-samurai-reviewReviewing Market Samurai is difficult without comparing it to similar products.  The problem is, there are very few to choose from that are in its class.  Most people will barely touch on all the key functions that it has to offer.  As a keyword research tool it really excels and if you need to research a market to completely dominate it then there is no better product currently available that does all that Market Samurai achieves.

If you know the power of this tool and arrived here simply to get promo discount codes then their current offer is really quite excellent but well hidden.  Download the free trial of Market Samurai from here. Try it free to make sure you like it then purchase the full version immediately and watch the price drop by over $50! That’s a huge 35% off the retail price.

I have been running this tool since the early days of its launch and have seen it grow into a full-featured app.  Powered by the very slick Adobe AIR platform, it looks like no other tool out there.  I have tested it quite thoroughly, running on these systems: XP, Vista, Windows Server 2003, 2008 and Win 7 and it looks identical and runs smoothly on each.  It interfaces seamlessly with Google, even offering Google’s Captcha code in a slick way.

Market Samurai offers:

  • Keyword Research
  • Rank Tracker
  • SEO competition analysis
  • Domain Research
  • Monetization
  • Content Finder
  • Content Publisher
  • Backlink Promotion

Market Samurai enables you to find and target profitable niches with incredible accuracy but how does it compare to the competition?  Well I have been a long time fan of Micro Niche Finder which is a software tool that does what it says on the tin.  Comparing the two it is fair to say that both offer extensive keyword research.  Results are far from identical but running the generated keyword lists from one and dropping it into the other gets highly addictive.  And highly targeted.

If I had to choose one I’d be happy with either!  Give me two and I’ll guarantee to create a niche that works every time.  I don’t want to detract from Market Samurai though.  The ability to create a new project, run a series of exhaustive tests on keywords finding high traffic ones with relevancy, assess market competition and commerciality all lead to a rounded product with astonishing value for money.

Downsides?  Hard to think of any but if I’m pushed I’d say that the average beginner dipping his toes into SEO would need some hand-holding. That said, this side is more than covered with the impeccable support.  Ticket systems, knowledgebase, forums, troubleshooter, video tutorials all help to get beginners quickly up to speed.

pcrmb-star-rating-5

PCRepairMan’s verdict:

Buy Market Samurai today if you care about ranking your site and researching profitable niche markets.


Can I install OEM software on Mac Boot Camp or Virtual Machine?

Well, it seems there are lots of people asking about this installing OEM Windows software on Mac desktops and laptops. This is a grey area that I’d like to clear up (or make slightly off-white). I’ll present the facts and you can make your own decision.

OEM versions are, in theory, to be used by system builders. It is generally accepted now, although unwritten, that people can readily purchase these and install them. Just look at the plentiful supplies on major ecommerce sites and you’ll see that the OEM software is not just for system builders. Effectively, someone who installs an operating system on a PC is doing the job of a system builder, it’s just the component assembly part they are missing, and many system builders actually buy whole machines now anyway.

The thing to note with OEM software, is that if your computer dials out for licence verification then it needs to be installed on just one piece of hardware to be classed as genuine. That’s the only check. Since Retail versions are much more expensive than OEM, people are naturally drawn to them.

There are a few things to be aware of for OEM installation which I’ll clarify here:

1)  Retail versions come with both 32-bit and 64-bit installations as an option. OEM versions are one or the other, so you will want to make sure you’re ordering the right version. For your Mac, check that it is a 64 bit machine and go for this if it is. If you do have 64 bit then choose a product like Windows 11 as it’s stable, well rounded and I have seen Windows 7 & 8 splutter and complain a few times. Something like a cheap Windows 11 OEM would be perfect.

The differences in 32 and 64 bit operating system software can often be marginal unless you are really pushing the computer hard, but for a small price difference 64 is a better operating system when on full load. Many software programs are 32 bit so they don’t take advantage of the extra ‘word architecture’ but when you run something like Adobe Photoshop 64 bit that is resource-hungry, it can be noticeable.

2)  OEM versions are tied to the hardware they are installed on and cannot be moved. This will only be an issue if you are planning on using virtualization software as well as your bootcamp (dual boot) installation, since the virtual machine “hardware” looks different to the real hardware.

3)  OEM versions do not come with telephone support from MS, although if you try to talk to a Microsoft representative about issues you are getting on a Mac then you may be fighting a losing battle as they are known to pass them back to you.

To summarise, I would go with an OEM dual-boot installation (64 bit if possible) OR run a virtual machine. You may even be able to run a cheaper XP licence as a virtual machine and this may suffice. If it is to run an older program such as MS Money this could work well as it may run more happily too.

64 bit architecture explained on Wikipedia

Drop me a comment below if this helped you or please click the social buttons to help others save a bit of money too.


WordPress SEO by Yoast – using sitemaps

If you are using the fabulous WordPress SEO plugin by Yoast, you’ll find that it also does the job of creating a sitemap for you.  You need to opt in to this within the plugin’s settings field here:
XML sitemaps” then tick the “Check this box to enable XML sitemap functionality“.

There are a few caveats that this plugin doesn’t make you aware of though and this can affect the whole indexing of your website by the search engines.

1. If you are now making reference to this sitemap elsewhere (such as within W3 Total Cache etc) then you will need to alter the path to your sitemap thus:

https://yourdomain.com/sitemap_index.xml

2.  You will need to remove any other sitemaps from your root folder. Look for:

sitemap.xml
sitemap.xml.gz


3.  Make sure that your robots.txt has this line:

https://www.yourdomain.com/sitemap_index.xml


Your XML sitemap doesn’t actually exist at this location so don’t think it’s not working if you can’t see this file. Yoast’s WordPress SEO plugin places the files in a subfolder of your uploads directory, and using WP Rewrite the URL will resolve to the right sitemap. It also works with Multi Site installs whether domain mapped or not.  To check it is functioning, fire up your browser and navigate to the sitemap (as in step 3 above). You should see the file there.


Hope this helps!


Check you have the latest Norton product version

norton-internet-security-2017-cheapest-renewal-price-serial-keyHere’s a well kept secret….Symantec offer a way to check you have the latest Norton product on your system and they actually give you a free upgrade if not.

If you are running a Norton product such as Internet Security, Antivirus or 360, click here to check for a free upgrade to other versions of Norton.

Save the file to your desktop and run it, it will prompt for action if you can get a free upgrade.

For cheap prices on Norton renewals, take a look at my software store which currently has huge discounts on Norton products


Notepad++ compare icons explained

Notepad++ compare iconsHere’s a brief explanation of the Notepad++ compare icons which are surprisingly undocumented:


  • Green plus symbol = line added
  • Red minus symbol = line deleted
  • Yellow exclamation mark symbol = line changed
  • Blue arrow symbol = line moved


You can access the compare menu from Plugins, Compare, Compare or by simply selecting Alt-D. You need to load the 2 files to compare first and have them as the last 2 on your tabbed list.


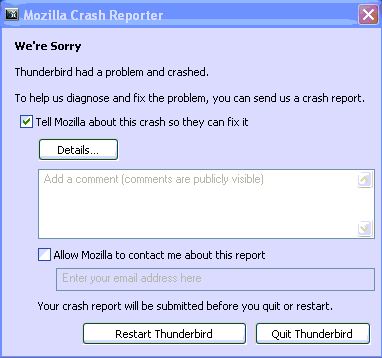
We’re sorry Thunderbird had a problem and has crashed

Thunderbird crashes repair fixIf you see the error “We’re sorry Thunderbird had a problem and has crashed”, all is not lost. I’ll take you through some fault-finding stages that may help.

Here’s what the window looks like on most computers:

Thunderbird had a problem and has crashed

Yikes, not great information there and submitting information to Mozilla doesn’t help you in the short term, although it helps them to develop the software better.

OK, the first step I take is to download and install the excellent free MozBackup from here:

https://mozbackup.jasnapaka.com/download.php

Close all open programs and run the tool. Create a backup accepting all the default options (this backs up everything).

Now we can work on the program without risk of losing data. Download the latest version of Thunderbird from here:

https://www.mozilla.org/en-US/thunderbird/all.html

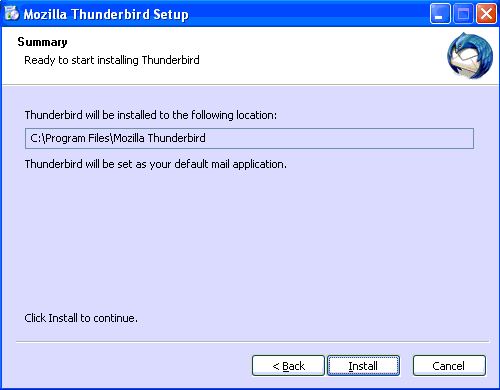
Now we are going to run the installation program and install it to the exact same location your existing one is in. Note, we are not uninstalling the existing version. If you are not sure of the location, accept the defaults. The installation program will not tell you it has detected an existing version but that’s OK.


Thunderbird reinstall after crash


For reference, I have done this countless times and the last was overwriting a version 8 with version 9.  If you are running a really old version then there may be a compatibility issue but I haven’t found anything that version 9 can’t successfully overwrite yet.

Restarting Thunderbird after the reinstall

Now we can start Thunderbird. It may prompt to update plugins which you can accept or disable those you don’t use. You should find your data exactly as you had before. In my experience, you only need to fill in your SMTP server details (if at all). If you have anything missing you can run MozBackup to reinstate it.

Install any plugins or add-ons that aren’t there that you previously had such as Spam filtering (via an Internet Security package or other such as SpamFighter etc).

Job’s a good’un and you should now have a fully functioning Mozilla Thunderbird without the “We’re sorry Thunderbird had a problem and has crashed” window!


PC freezes at chkdsk.sys

Fault: PC freezes at chkdsk.sys

This is a common fault that we see in our workshop. It can occur in safe mode and normal mode but with normal mode the PC often fails to load windows and just keeps restarting itself. This happens on desktop PCs and very often on laptops as they suffer knocks and bumps to the hard drive and battery failure.

The problem is the disk itself in 99 percent of cases.  Whether it can be fixed is down to a number of factors but, in short, here’s how we go about testing it and repairing the fault. I’ll presume that you wish to recover data (documents, images, emails etc) from the disk as most of our clients do. We have a great success rate in recovering data and getting Windows running again with this method.

First, we set the host PC’s bios to start from CD.  If you don’t know how to do this then take a look at my article How to change the boot order of a PC.

Next, we’ll pop over and get a copy of the excellent HDD Regenerator, downloadable here (link opens in a new window). This is the single most useful disk checking tool out there at the moment. It’s not free but it will give you the best chance of data retrieval. Also it’s a tool that is very useful to have in your repair arsenal and you can fix other PCs with it too. I’ve written a full review of HDD regen here. You’ll need to use another PC to create the bootable CD or DVD with but as you’re reading this I’ll presume you have access to one. HDD regenerator can also create a bootable flash drive but for maximum compatibility use the CD.

Next we boot the dead PC with our CD (or Flash drive) and enter the HDD regenerator interface. Tell it to scan the correct hard drive (often there’s only one anyway) and let the program do its stuff, all automatically. Allow an hour or more to scan a drive of about 160GB on a typical Windows XP machine. Newer PCs have better, faster processors and more RAM but they often have bigger drives so a typical scan can take a few hours.

Remember, what the program is doing is a sector-by-sector analysis of your hard drive and moving data from bad areas of the drive to good. This takes time, often we see scans running for several hours, but it will ultimately help you to be able to recover your data and in most cases get Windows restarted. You can also leave the scan running overnight, you don’t need to sit and watch it!

After the chkdsk.sys error repair

With the drive finally scanned, the program reports how many bad sectors it found and you simply press ‘Esc’ to quit the program.

Restart your PC, removing the CD on the initial restart, and make it your first job to backup those files you thought you had lost!


Reference: chkdsk.sys fault when computer starts causes PC to hang or freeze


Notepad PlusPlus search up and down annoyance

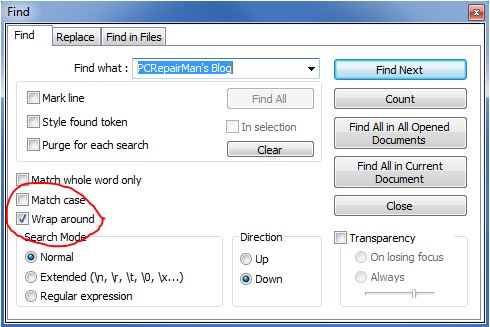
With Notepad++ freshly installed, the default behaviour for the search function is to select either “Up” or “Down” directions.  This for most programmers is hugely annoying because the document start or end is reached before all instances of the word or phrase are found.  Find and replace uses the same functionality too.

Fortunately, there is a fix.  You should tick the “Wrap around” checkbox as I have highlighted below.  This will then give you the (correct?) full search behaviour.

Notepad plus search up down loop find replace

Hope this helps shave a few minutes off your day and saves some RSI on the wrists!


Install Xampp on Windows 7 64 bit

Xampp setup on WIndows 7

This is a guide which shows you how to install Xampp on Windows 7 64 bit.

Visit apachefriends.org to get the Xampp distribution for Windows.  I prefer the non-installation zip file so let’s get this one. The zip or 7zip files are the same but you’ll need another zip utility such as 7zip or WinRar to unpack the 7zip archive. If in doubt, get the zip as Windows can extract files from this one.

Unpack the zip file onto your hard drive. My test PC was partitioned into C and D so I unpacked the file to get this structure:

d:\xampp

You can likewise use your C drive, just replace D with C in all my examples. I prefer a separate partition so that a Windows reload would not wipe these files and since it’s a standalone installation, a new Windows install would allow Xampp to work with no configuration.

Next, we should now be able to run the Xampp control panel by navigating to the newly created xampp folder in My Computer, then double clicking this file:

d:\xampp\xampp_control.exe

If this is not visible, there is an icon in the system tray (bottom right of the screen) that will pop the Xampp Control Panel up again. You may need to use the arrow to expand the tray icons and make it visible. At this point I usually make the tray icon always accessible by dragging it to the visible tray area.

Tick the svc boxes under MySQL and Apache and click the Start button on both. You now should have both services report that they are running

Apache runs and then stops again in Xampp

Xampp and Skype – arch enemies

After a lot of testing I came to this conclusion…. they both hate each other! They are fighting for attention on port 80. Now we can either make Skype dump data on another port or, and I believe this to be the better way, close Skype while we are working in the Xampp environment. Given that there is a bug in Skype on Windows 7 where it is always displayed on the taskbar, even when closed or signed out, you will need to completely close Skype in Windows 7.  The solution and quickest way is to right click on the Skype icon on the taskbar and click on Quit. This stops Skype from monitoring port 80.

Other offenders can include TeamViewer, UVNC, Crossloop and LogMeIn if they are set to be resident. Simply quit these applications to avoid conflicts.


OK, let’s push forward and check we now have Apache and MySQL running by firing up Xampp’s information page. In your browser’s address bar, type in:

https://localhost/xampp

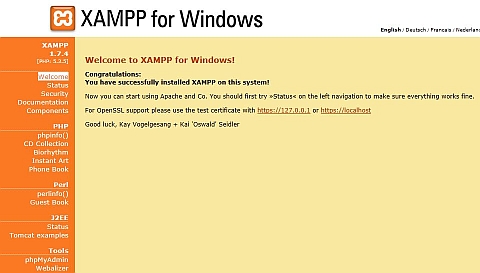
This should give you this Welcome and Information screen:

Xampp configuration Windows 7 64 bit

In this screen there should be a page with a column of options down the left side.  Now depending on your screen size and whether your browser has toolbars installed, you may miss the bottom few lines. On our test laptop with a 15.4″ screen this missed the last few rows.

Xampp configuration screen cannot read lower items


No problem though, we can disable the toolbars temporarily or just type in the browser command we require.  Here you can see the last entry for reference:

Xampp configuration screen fixed

Right, so we can now setup WordPress as all we require is Apache and MySQL to simulate our server.

Setup WordPress in Xampp

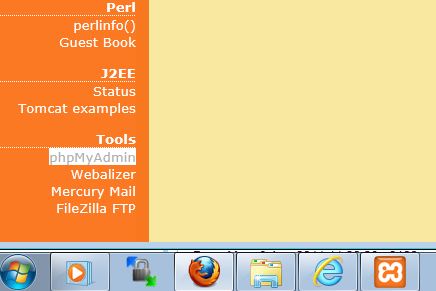
We are going to use phpMyAdmin to create our database that WordPress will run on.  On the Xampp info page, click on the menu item ‘phpMyAdmin’ OR in your browser go to

https://localhost/phpmyadmin

Note I am using forward slashes here but if you use backslashes it will resolve to the same place. Best to use Unix server syntax though as it’s great practice if you are a Windows user wanting to do things correctly! It will stand you in good stead if you need to get your hands dirty on a real server.

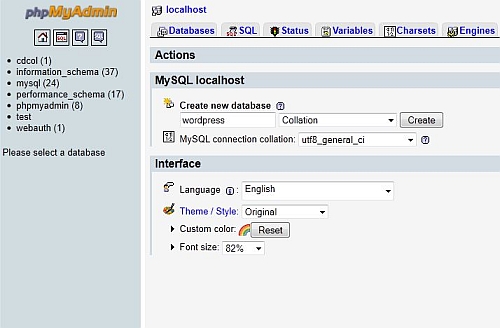
Okey dokey, let’s setup WordPress’s database. Under MySQL Localhost, type in “wordpress” as the database name. Check your options are as shown below:

Xampp phpmyadmin wordpress setup

If you are seeing a slightly different screen to the one above, this is because you’ll be running a later version of phpMyAdmin. No problem, the important thing to make sure you get right is the utf8_general_ci and the name of the database. The name of the database can be anything really, just don’t use special characters. I often use the name of the domain I am developing.

Let’s move on to WordPress now. Download the latest and greatest version from here and unzip it to your desktop. You should now have a folder called wordpress. Open this and look for the file

wp-config-sample.php
Look for the following lines

/** The name of the database for WordPress */
define('DB_NAME', 'database_name_here');

/** MySQL database username */
define('DB_USER', 'username_here');

/** MySQL database password */
define('DB_PASSWORD', 'password_here');

/** MySQL hostname */
define('DB_HOST', 'localhost');

/** Database Charset to use in creating database tables. */
define('DB_CHARSET', 'utf8');

Carefully edit the lines to read this:

/** The name of the database for WordPress */
define('DB_NAME', 'wordpress');

/** MySQL database username */
define('DB_USER', 'root');

/** MySQL database password */
define('DB_PASSWORD', '');

/** MySQL hostname */
define('DB_HOST', 'localhost');

/** Database Charset to use in creating database tables. */
define('DB_CHARSET', 'utf8');

I’d advise you stick to this because in Xampp, ‘root’ is the default user and there is no password. Note that I only modded 3 lines, I just left the last 2 in for info as some people change these unnecessarily. Now save this file as wp-config.php in the same wordpress directory (it will not work if you just save it as wp-config-sample.php!)

Copy the whole wordpress folder over to the xampp htdocs directory so you now have

d:\xampp\htdocs\wordpress

Developer tip:

If you are setting up Xampp as a test environment for building client websites, use the name of the client or their domain instead of ‘wordpress’ as a folder name. At this point, you can copy the folder to another within htdocs and rename it to something else, ready for your next project,eg:

htdocs\domain1

htdocs\domain2

Navigate in your browser to

https://localhost/wordpress/wp-admin/install.php

and you should see the WordPress installation routine. Choose the following:

Site name: TESTSITE

Username: abc

Password: abc

Untick the “Allow my site to appear in search engines…” box

Add any email address

Click “Install WordPress”

At the ‘Success’ screen, login with username: abc and password: abc

You can now login at any time that xampp is running Apache and MySQL by going to this url in your browser:

https://localhost/wordpress/wp-login.php


Congratulations! You can now modify your WordPress theme files directly in the WordPress themes folder (wp-content/themes/theme-name) and refresh your browser page for quick and easy theme or template development with no FTP! Once you have modified your files, then you can save them elsewhere as a backup and upload them to your server.


Email settings for Tiscali UK

email-settings-pop-imap-tiscali-orange-talk-bt-02-plusnetHere are the current email settings for Tiscali users.  Tiscali has been taken over by TalkTalk but users are still advised to use the old ‘legacy’ settings listed below.

Please bear in mind that there are 2 main types of email client setup, one which uses Pop3 and the other which uses IMAP. In short, IMAP “synchronises” your PC or phone with the Tiscali server and keeps emails on both while POP3 downloads all emails to your PC or phone. If you are setting this up on an iPhone, I’d recommend using the IMAP service. You can even use your PC on IMAP as well as your phone so everything syncs nicely.

Tiscali email settings for Outlook, Outlook Express, Thunderbird, iPhone and iPad

Anyway, here are the current Tiscali email settings. I’ve included FTP and Webspace to make it a definitive list, but these aren’t needed to setup your email:


Login[email protected]
Incoming email (POP3)pop.tiscali.co.uk
Incoming email (IMAP)imap.tiscali.co.uk
Outgoing email (SMTP)smtp.tiscali.co.uk
FTP serverftp.myweb.tiscali.co.uk
Webspace addresshttps://myweb.tiscali.co.uk/directoryname