Cannot set autoresponder for Microsoft Exchange Outlook Web App

Quite a few people have asked me about the fields being greyed out in the autoresponder section of the Microsoft Exchange Web App. Here’s how to set your vacation autoresponder:

  • Mail
  • Options
  • See all options
  • Tell people you’re on a vacation
  • Select “Send automatic replies”
  • Tick “Send replies only during this period”
  • Select dates that apply to you
  • Type your autoresponder text to contacts inside and outside your organization (2 separate boxes)
  • Click Save

Have a nice trip!


How to clear the DNS cache

clear dns cache mac windows

Your DNS cache stores IP addresses of webservers. These servers have delivered pages which you and others have recently viewed. If the location of the web server changes for any reason before the entry in your DNS cache automatically updates, you will find yourself unable to access the website. You may also see a lot of 404 error codes, which generally happens when your DNS cache is messed up.

This is particularly prevalent for Webmasters who are setting up a new website and suddenly get presented with an old page or no page at all. Often it is visble on another computer or mobile phone which makes it even more frustrating.

By clearing this DNS cache, your computer will then re-query the nameservers for the new DNS information.

How to clear your computer’s DNS cache in Windows 2000, XP, Vista, 7 or 8

  • Click the Start button
  • On the Start menu, click Run
  • If you do not see the Run command in Vista/7/8, enter “run” in the Search bar just above the start orb
  • Type the following in the Run text box: ipconfig /flushdns
  • Press Enter

Pay attention to the space between the g and the forward slash.

Close the command window and retry your browser.

How to clear your computer’s DNS cache in Mac OS 10.7 onwards

Please note that for this to work you require the Admin account password.

  • Click Applications
  • Click Utilities
  • Double click the Terminal application
  • Type in: sudo killall -HUP mDNSResponder

Close the terminal window and retry your browser.

How to clear your computer’s DNS cache in Mac OS 10.6 and below

  • Click Applications
  • Click Utilities
  • Double-click the Terminal application
  • Type in: dscacheutil -flushcache

That’s it and you should now be able to fire up your browser and get a fresh version of the page.


AVG antivirus free and paid editions – the differences

avgidsehOK, let’s look at what the differences are in the versions of AVG antivirus.  First off, the free version has EXACTLY THE SAME virus and spyware scanning detection and removal as its paid-for counterpart.  The difference lies in the added extras.  Here’s what you currently get with the free version:

  • Antivirus scanning as per the full version
  • Antispyware scanning as per the full version
  • Link scanner which checks for malicious webpages in search results
  • Resident shield, checking files on your PC as you access them

What you don’t get that the paid for AVG Antivirus gives you:

  • Online shield which protects against some online attacks
  • Phishing protection, checking for spoof websites
  • Anti rootkit protection (these are getting more common now and are a huge threat to your PC)
  • Game mode keeping you safer during gaming
  • Free technical support from AVG

And finally what the AVG Internet Security suite gives you over the other 2 above:

  • Spam protection
  • Advanced firewall
  • Identity protection

AVG will guide you towards the paid version when you try to download the installation program.  In fairness, this is how they make their money so they can’t be criticised for that.  The ‘trial’ version is simply a version of the full product which will expire after 30 days so if you are looking for a free solution then it’s not the one you want.  However, if you have already installed the trial version and wanted the free one, this can be swapped over easily as of version 9.0, read on…..

If you have installed the TRIAL version by accident (not the free version) then there is an easy way to convert it to the free version.  Go to your Start menu, click on All Programs and navigate to the AVG folder (this may be called AVG 9.0).  Click on it and then click on ‘Uninstall AVG’.  Follow the prompts as though you are going to uninstall then you should see a dialogue box saying that you can turn it into the free version.  Let the program do this and enable the Windows firewall when prompted (this is important as the free version has no firewall).

With paid antivirus and internet security packages you do get more bells and whistles, but for a good, stable, solid performing antivirus with built-in antispyware for zero money, AVG free really can’t be beaten.

For paid antivirus, we regularly run testing here at PCRMB towers, so check what is currently the cream of the antivirus crop and see how it compares against your current solution.


AVG keeps asking to upgrade

You have a problem where AVG antivirus is prompting you to upgrade all the time.

What has probably happened here is that you have installed the wrong version.  You wanted free and you installed the trial version.

AVG does try to ‘direct’ you towards the full product as a trial version.  The free version is generally cleverly made less accessible on their website.  Remember though, this is a free product and offers the same scanning and detection capabilities as the full version so they are doing you a favour by giving it away.  You can’t blame them for wanting to make some money!

Click here to see the differences between free and paid for versions of AVG antivirus


Yoast WordPress SEO double title fix

If you are getting a double title appear in the tab of your browser as you hover over it, there is a good chance that it’s because you have WordPress SEO by Yoast installed. Often just ticking the box ‘Force overwrite titles’ (from the Titles and Metas section on the General tab) will suffice, but I have seen this on many customer themes where it doesn’t work and usually gives the address as a simple URL. Not great for SEO!

Here’s the fix. Look in your WordPress theme files for header.php and then open it in Notepad or ideally Notepad++. Now look for this line or similar (it differs from theme to theme):

<?php wp_title('|',true,'right'); ?>
<?php bloginfo('name'); ?>

Now replace it with:

<?php wp_title(''); ?>

Upload this file to your WordPress theme, overwriting the existing header.php.

Make sure the ‘force overwite titles’ is still unticked. Save your changes and empty any caches you have, eg W3 Total Cache. Check your category titles and post/page titles and they should be fixed!


Norton subscription has expired – but it hasn’t!

A fairly common fault is for a Norton product such as Antivirus, Internet Security or 360 to report that your subscription has expired when it hasn’t. This can be due to a number of issues and often occurs after some major Windows updates or when there are problems with the Symantec (Norton) subscription servers.

The best methods to address this I have found are to do these in steps in order. If any one works then you have resolved the problem and need to go no further. Before trying these you will need to be connected to the internet.

1. Try a manual update – Open the main program window (double click on the tray icon or open it from the desktop icon) and do a ‘check for updates’.
2. Restart the computer – This ensures you have nothing that is pending a restart and affecting the definition updates.
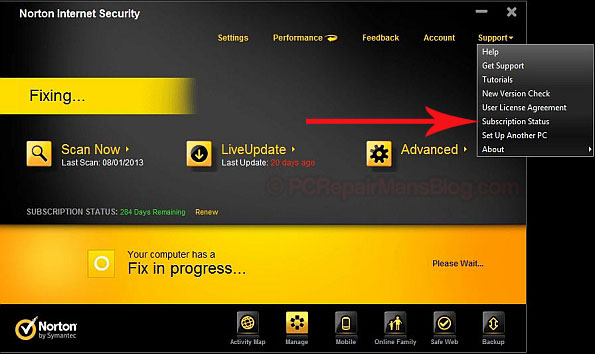
3. Force a subscription check – In the main Norton window, click “Support” then click on “Subscription Status”. After the “Subscription Status Check” is complete, click “Finish”. This updates the subscription information of your installed product to the status that is stored on the Symantec (Norton) servers.

Norton internet security subscription expired
4. If you still have an issue beyond this then you will need to login to your Norton Account and check your subscription status then raise any issue you have with Symantec support. Use the menu “Support” then “Get Support”. If you didn’t create a Norton Account then you can still talk to support, just try to have your serial number handy from the original installation.

Hope this helps you, please drop me a comment below if it does.  If you want to save a lot of money on renewal then check out my articles on The cheapest way to renew Norton 360 or The cheapest way to renew Norton Internet Security


Can I install OEM software on Mac Boot Camp or Virtual Machine?

Well, it seems there are lots of people asking about this installing OEM Windows software on Mac desktops and laptops. This is a grey area that I’d like to clear up (or make slightly off-white). I’ll present the facts and you can make your own decision.

OEM versions are, in theory, to be used by system builders. It is generally accepted now, although unwritten, that people can readily purchase these and install them. Just look at the plentiful supplies on major ecommerce sites and you’ll see that the OEM software is not just for system builders. Effectively, someone who installs an operating system on a PC is doing the job of a system builder, it’s just the component assembly part they are missing, and many system builders actually buy whole machines now anyway.

The thing to note with OEM software, is that if your computer dials out for licence verification then it needs to be installed on just one piece of hardware to be classed as genuine. That’s the only check. Since Retail versions are much more expensive than OEM, people are naturally drawn to them.

There are a few things to be aware of for OEM installation which I’ll clarify here:

1)  Retail versions come with both 32-bit and 64-bit installations as an option. OEM versions are one or the other, so you will want to make sure you’re ordering the right version. For your Mac, check that it is a 64 bit machine and go for this if it is. If you do have 64 bit then choose a product like Windows 11 as it’s stable, well rounded and I have seen Windows 7 & 8 splutter and complain a few times. Something like a cheap Windows 11 OEM would be perfect.

The differences in 32 and 64 bit operating system software can often be marginal unless you are really pushing the computer hard, but for a small price difference 64 is a better operating system when on full load. Many software programs are 32 bit so they don’t take advantage of the extra ‘word architecture’ but when you run something like Adobe Photoshop 64 bit that is resource-hungry, it can be noticeable.

2)  OEM versions are tied to the hardware they are installed on and cannot be moved. This will only be an issue if you are planning on using virtualization software as well as your bootcamp (dual boot) installation, since the virtual machine “hardware” looks different to the real hardware.

3)  OEM versions do not come with telephone support from MS, although if you try to talk to a Microsoft representative about issues you are getting on a Mac then you may be fighting a losing battle as they are known to pass them back to you.

To summarise, I would go with an OEM dual-boot installation (64 bit if possible) OR run a virtual machine. You may even be able to run a cheaper XP licence as a virtual machine and this may suffice. If it is to run an older program such as MS Money this could work well as it may run more happily too.

64 bit architecture explained on Wikipedia

Drop me a comment below if this helped you or please click the social buttons to help others save a bit of money too.

Display RSS feeds easily in your browser

If you’re looking for a way to display RSS feeds easily in your browser then look no further.

First off, if you are using Internet Explorer then please consider changing. At the moment it is not as standards-compliant as most other mainstream browsers (Firefox, Chrome, Opera etc) and it has more security vulnerabilities unless fully patched up-to-date. Even then, most exploits are targeted at IE, making it the least secure in my eyes. To get up-to-date, head on over to https://mozilla.org and download the latest and greatest version of Firefox. If you are installing Firefox and want to import your Internet Explorer bookmarks, it will offer you the choice during installation. Nothing in Internet Explorer is changed and you can always go back to it (if you really must!).

Once installed visit this page:

https://addons.mozilla.org/en-us/firefox/addon/rss-ticker/

and click ‘Add to firefox’ button, then ‘Install now’. Restart Firefox and visit your favourite website (pcrepairmansblog.com of course!). Look for the feed link, it may say ‘Feed’, ‘RSS’, ‘XML feed’ etc or may just have the RSS  icon like this: Display rss feeds easily in your browser

Now you have the ‘feed’ displayed in your browser. A feed is really just some live data that shows the most recent activity, so for a website it may show the latest articles and for a forum the latest posts etc.

At the top of the page, click on the “Subscribe now” button and you’ll now get the latest feed pushed directly to your browser.


Firefox rss ticker


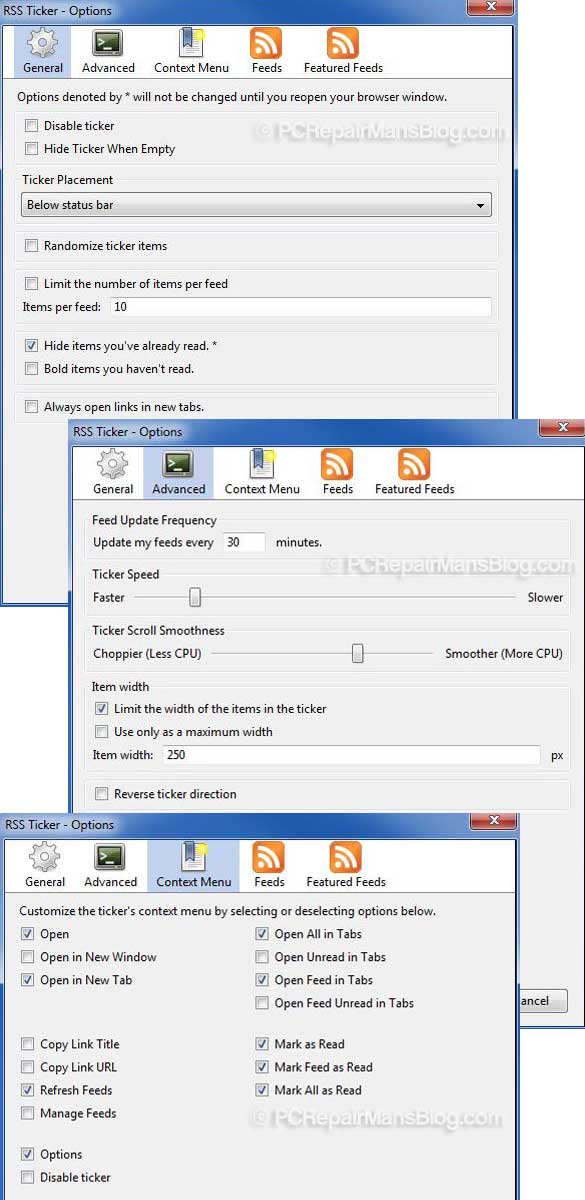
Now you should right click on the ticker bar at the bottom and select ‘Options’. This is where you can remove some of the default feeds and set your preferences.  I like to have these settings:

rss ticker setup options


So you should now have a free feed reader and no need to swap software while you are browsing to keep up-to-date on your favourite sites. Most feeds can easily be brought into the browser and many site owners are oblivious to this fact so they don’t put up an RSS link or icon. Try the following combinations to get to their feed:

https://sitename/feed/rss
https://sitename.com/rss.xml
https://sitename.com/index.php?action=.xml;type=rss

Once you have it, let the site owner know they are missing a trick by not providing a link to it. Mine’s in the footer under ‘News feed’ and I also have a feed just for site comments. Have fun!


How to show file extensions in Windows XP, Vista and 7

File extensions are those 3 or 4 little letters after the dot which tell Windows what type of file it is.  For example:

  • report.xls is an Excel spreadsheet (.xls)
  • report.doc is a Word document (.doc)
  • report.exe is a program (.exe)

By default, file extensions for known file types are hidden in Windows operating systems.  In my view this is both stupid and dangerous.  Stupid because we need to see what type of file we have in front of us.  Dangerous because double clicking report.exe doesn’t open Word, it opens the file as a program which could potentially be a virus.  You can however change this setting so that file extensions are shown for files in a certain folder or for all files on your hard disk.

To show file extensions in Windows XP

Open “My Computer”, select “Tools” then “Folder Options…”

In Advanced Settings, untick “Hide extensions for known file types.”

To show file extensions in Windows Vista or Windows 7

Open Computer from the Start menu

Click the Layout button (to the left of the Views button)

Click Folder Options
Click the View tab
Untick Hide extensions for known file types
Click OK

This setting will make file extensions appear in all folders in both XP , Vista and Windows 7.

If you want to hide file extensions at a later time, you can tick the box again then click OK.  I’d recommend that you leave it like this as it is far safer and easier to show them.


How to change boot order to start from CD or USB

Often, we need to change a PC or laptop’s boot order to start from CD, DVD, USB, external hard drive or floppy disk.  It’s not difficult to do this but timing is important.

Turn on or restart your computer and watch for a message during the startup screen about which key to press.  It’s usually Del, F10 or F2 and you need to press this key as soon as you see the message on screen. The window of opportunity is really quite small – about 2 seconds – before the computer loads the operating system (eg Windows).

Now, if you have done this correctly you will see another screen loaded.  If you have gone on to the Windows load screen, you will need to wait, shutdown and try again. Don’t be tempted to turn the computer off on the button or at the wall socket as this will cause even worse problems.

The new screen you see is called the BIOS screen. It will look like this, although not exactly as many manufacturers will have different setups.

phoenix-bios-boot-order

This allows control over the hardware in your PC such as CD/DVD, USB, memory, processor, hard disk drives etc. It is generally a blue background and navigation is done using the keyboard cursor keys (the arrows) and not the mouse. Navigate to the ‘boot’ area and change the order of the boot sequence so that your CD boots first. In the example above, the hard disk boots before the CD ROM so this would need changing. Save and exit the bios screen. This restarts the computer. Make sure you have a CD in the drive that you wish to boot from. Do likewise if you wish to boot from USB (some older BIOS systems do not support USB booting).

PCRepairMan’s top tip:

Note that many BIOS systems look confusing at first but they usually have helpful prompts for how to navigate and change values stored in them. In the screenshot above, you can see the bottom of the page shows Arrows to move, Enter to select, Page Up/Down to change values, F10 to save etc.

With a new boot order set, your computer will look to that device to start every time. This can be a problem after the fix, when the PC is set to boot to usb and you plug in a non-bootable USB, for example a printer. The BIOS can look at the printer and hang, waiting for it to do something.  If this happens, simply change the boot sequence back to your hard drive first and this will resolve it.