How to clear the DNS cache

clear dns cache mac windows

Your DNS cache stores IP addresses of webservers. These servers have delivered pages which you and others have recently viewed. If the location of the web server changes for any reason before the entry in your DNS cache automatically updates, you will find yourself unable to access the website. You may also see a lot of 404 error codes, which generally happens when your DNS cache is messed up.

This is particularly prevalent for Webmasters who are setting up a new website and suddenly get presented with an old page or no page at all. Often it is visble on another computer or mobile phone which makes it even more frustrating.

By clearing this DNS cache, your computer will then re-query the nameservers for the new DNS information.

How to clear your computer’s DNS cache in Windows 2000, XP, Vista, 7 or 8

  • Click the Start button
  • On the Start menu, click Run
  • If you do not see the Run command in Vista/7/8, enter “run” in the Search bar just above the start orb
  • Type the following in the Run text box: ipconfig /flushdns
  • Press Enter

Pay attention to the space between the g and the forward slash.

Close the command window and retry your browser.

How to clear your computer’s DNS cache in Mac OS 10.7 onwards

Please note that for this to work you require the Admin account password.

  • Click Applications
  • Click Utilities
  • Double click the Terminal application
  • Type in: sudo killall -HUP mDNSResponder

Close the terminal window and retry your browser.

How to clear your computer’s DNS cache in Mac OS 10.6 and below

  • Click Applications
  • Click Utilities
  • Double-click the Terminal application
  • Type in: dscacheutil -flushcache

That’s it and you should now be able to fire up your browser and get a fresh version of the page.


Windows 7 dvd

The Windows 7 DVD can upgrade your PC to Win 7. Prices are a little keener than Windows 8 at the moment it seems. You can go the upgrade path, eg buy a Windows XP to Windows 7 upgrade disc, but I would always recommend backing up all your files and then doing a fresh installation as your PC will usually be quicker as a result. For this you will need to purchase a Windows 7 OEM or Retail DVD.

[phpbay keywords=”windows 7 dvd (oem, retail)” num=”9″ siteid=”1″ sortorder=”EndTimeSoonest” templatename=”columns” columns=”3″]


Get more space on Dropbox

Here’s a great way to get more space on Dropbox, the free secure online file storage service.

Recently, Dropbox offered an increase to customers who used the Camera Upload facility. This method takes advantage of their generous offer and allows you to use that free space to the maximum.

First, if you haven’t got this great free online storage tool then click here to download it with a free gift of extra storage from me!

Note down your current Dropbox allowance by left clicking once on the tray icon (eg 1GB% of 2.5GB used). Don’t skip this step.

Copy 2.5 GB or more of video files to a pen drive or external hard drive. Don’t try to just copy to a folder on your PC as this won’t work!  You can use photos (or even a combination of photos and videos) but lots of small files take much longer to upload. Try to avoid a single movie that is very large, eg 3.5GB as syncing this is often flaky. If you’re in a hurry, increase your syncing speed by right clicking the tray icon then Preferences > Bandwidth and select ‘Don’t limit’ on both upload and download speeds.

Switch off other Dropbox devices that sync, just use one PC.

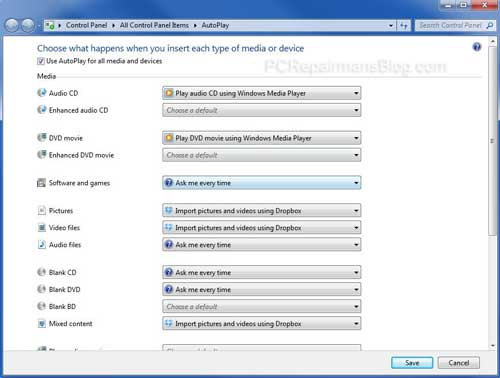
Put the pen drive in, allow the Dropbox pop-up import box to show. If it doesn’t show, select it from the Windows autoplay box. Note: if autoplay is not enabled, click on Start > Windows > Type “autoplay” and click the Autoplay link in the panel above at the top. You should set “Import pictures and videos using Dropbox” in the following fields as shown:

Windows autoplay Dropbox


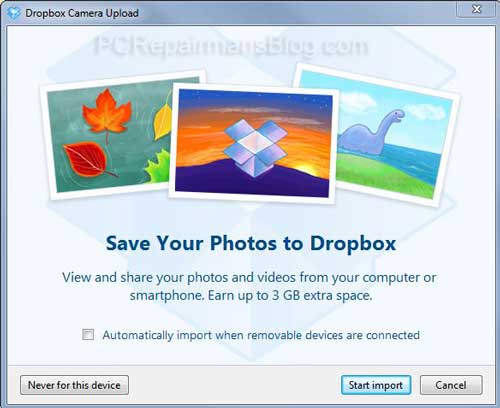
Once you see the Dropbox Camera Upload box, untick the ‘always do this’ box (IMPORTANT if you are not interested in always using the feature).
Import to your Camera Uploads folder in Dropbox.

Dropbox camera upload

Let the import finish, syncing starts immediately. Note this may take several hours or days depending on your connection speed! Watch your allowance go up to 3GB more than you had before (eg 4GB% of 5.5GB used).
Delete the files if you want to, but leave 1 in there. Rinse and repeat using the same pen drive for any other Dropbox accounts, family or friends. Rename a few files and swap one each time just in case. Now you have extra space and can use it whenever you want.


Dropbox free space FAQ

Why copy 2.5GB not 3GB of files to Dropbox?

This is because Dropbox currently give you 0.5GB for using the Camera Upload feature and 0.5GB for each further 0.5GB of files that you copy over.

What about Dropbox’s upload and download speed settings that I changed?

Change them to whatever you are comfortable with. If you have a slow connection then limit it to 50kB/s download and 10kB/s upload, otherwise don’t limit it.

Does this work on the iPad/iPhone?

Sure does. Download the iPad and iPhone app here. This link takes you directly to the App Store and allows you to download the free Dropbox app. Once installed, any future camera photos and videos will be seamlessly transferred to secure online storage. Dropbox is indispensable for the iPad and you can use it to upload files (including movies) to the iPad too, without iTunes!


Final thoughts

If your friends don’t have Dropbox then please point them to this article and get them to use my download link above to say thanks. Dropbox is a great tool and has been completely stable on my systems and client systems for many years.


Prevent scheduled disk check in Windows Vista

Occasionally you may need to prevent a scheduled disk scan in Windows. This occurs during the reboot phase and can take a long time, sometimes even an hour or more depending on drive size and data contained on it. Once started it can’t be stopped. Turning the power off can cause corruption to the hard drive.

Here’s the answer to prevent it from occurring on restarting the PC:

Open the command prompt with administrative privileges (Type “cmd” in the search box in the Start Menu, then right click cmd.exe in the search results and select “Run as Administrator”)

Type “chkntfs /x c:” (where c: is the drive letter of the hard drive you wanted to scan).

This will cancel the scan and allow a speedier reboot.


GoDaddy 99 cent domains are back!

Godaddy cheap domain trickYes, GoDaddy 99 cent domains are back with this simple method and coupon code for December! It’s limited to 3 per account but does include existing GoDaddy account holders to purchase. I’ll show you below how to mix it up and get 6 domains for as low as $4.

At time of writing, 4USD = about 2.50GBP or 3.8AUD or 4.7 NZD or 3Euro

Start off by opening GoDaddy using this link (opens in a new window).

Sign up or login if you are already a customer.

First off, if you are from any country other than the US, set your primary currency to dollars. I’m outside the US but I keep it in this currency as it’s often where the better deals are.

Search for your 3 .com domains and add them to your basket.

Set all domains to 1 year duration using the dropdown menu.

Below each domain you see this:
YOURDOMAINNAME.INFO FREE with .COM or .CO^ – Add

Click the little ‘Add’ link for each one, this will add the free .info to your basket.

Verify your domains and that the corresponding .infos are all there, you should have 6 domains in total.

Now go to your Order Summary box on the right side of the page and add this special GoDaddy promotional coupon code:

LKSRTL99X

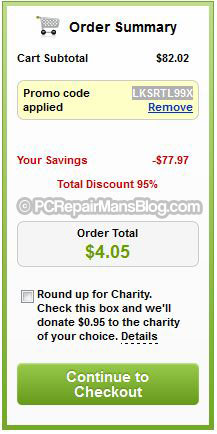
You should see that all 3 of your .coms have dropped to $0.99 (plus $0.18 tax) and that the .infos are completely free (with $0.18 sales tax). Something like this:

Godaddy 99 cent domain coupon code


Godaddy free info domain


At their current non-discounted prices (and GoDaddy are reasonable for their full-price domains) the basket would cost $82 for those 6 domains. Using this trick it comes down to a shade over $4.

That’s a $78 dollar saving, or 95% if you prefer!

Here’s what I have just ordered:

Godaddy 99 cent domains coupon deal

Yes that really is just over $4 for 6 domain names!!


Update: Working GoDaddy coupon codes for January 2013:

Enter code cjc295j1 for any domain at $2.95

Enter code gd3115c for any .info at $1.49

Enter code UNLOCKED for any .com at $1.17

Bookmark this page and check back for new codes before purchasing any domain!


Go straight to GoDaddy and register your domains now (link opens in new window).


Facebook This public profile is not visible

Problem: You have added a Facebook “Like” box to your website and it worked at first, but now it shows this error “This public profile is not visible”. Here’s a snippet of what it looks like:


Facebook this public profile is not visible

Well, it WAS working.....!


If you login to Facebook then return to your website, you’ll probably see that the “Like” box now appears correctly and shows some happy users. So what’s the problem and how do I fix it?

Well, first off you must make sure that your Facebook page and website are suitable for an audience of people aged 13 or older. They are?  OK, let’s proceed.

Login to Facebook and edit your page.

In the left column, click on “Manage Permissions” .

Change the age restrictions setting to “Anyone (13+)” and save the settings.

Logout of Facebook and go to your website. Refresh the page and you should now see all information correctly presented. It’s a common mistake but one which is easily solved.


Server returned error “SSL error: self signed certificate”

So you’re getting a security error when picking up other email accounts in Gmail like this:

Server returned error “SSL error: self signed certificate”

What does this point to? Well it seems that on 12th December 2012, Google decided to update the way they fetch external emails within Gmail and now insist on the server having not just a self-signed certificate but a full-blown one. That’s OK, but it would have been nice to have been told about it.

Full certificates can cost an arm and a leg (lots of money!) and they are quite varied in features. I am a big fan however of the Rapid SSL Wildcard certificate from the SSL store which fits the bill and is very keenly priced. This currently has a huge $78 off and can be used on your whole domain, ideal if you have multiple domains or even just want to do Facebook timeline stuff later on (this requires SSL certification too). If your website has a shop on there, I would heartily recommend the Comodo Premium SSL Wildcard Certificate from the same guys which I have used on a few VPS and dedicated servers.

If you just want to get up and running quickly for free, you can simply drop any SSL external accounts to port 110 (POP) and port 25 (SMTP) which should get you live again. Send a few test emails to check things are running OK. Bear in mind that this is then transmitting emails insecurely so the domain will need the SSL certificate as soon as possible. While the Rapid Wildcard Certificate mentioned above is on offer it makes sense to lock things down sooner rather than later.

Please drop me a comment below if you get chance and this helped you out!


Banner (468 x 60)


Remove all hyperlinks from a Word document

The procedure to remove all hyperlinks from a Word document is quite straightforward but a well-kept secret.

This annoying behaviour often happens when you copy and paste text from a website. There is a simple way to remove all hyperlinks from word file.


Remove all hyperlinks from a Word document at once:

Select all of your text by pressing Ctrl+A

Press Ctrl+Shift+F9

All hyperlinks will be removed at once and you should be left with plain un-linked text.


Another trick I use to remove hyperlinks (and any other formatting) is to paste the copied text into Notepad. Copy the text again and then paste it into anywhere you want (Word, WordPress etc).


Differences between Cat 5 and Cat 6 network cable

I am often asked “what are the differences between Cat 5 and Cat 6 network cable?”. Here’s my take on it:

Physical differences between Cat 5 and Cat 6 network cable

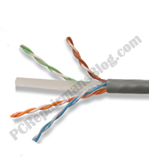
Cat5 Cat6 Cable DifferencesThe main physical differences between these cables is the way in which the spacing inside the cable is maintained. By spacing, I mean that between the pairs of copper wires there is a physical divider. This is most often made of a flexible plastic and it’s like a ‘plus’ sign in cross-section, running down the center of the cable with the 4 cable pairs separated into each quadrant. In a few cases there is foil wrapping used and separation is done with a braided sheath.

The idea behind this separation is that it reduces “crosstalk” between cables hence the data packets are not lost and speed of transfer is improved.

Cat 5 and 6 bandwidth rating

Category 5 cables are rated at 100 MHz, Category 6 cables are rated at 250 MHz. This effectively means you could push 2.5 times the amount of data down them but in the real world this is not always the case as there are a few other factors that come into play. Category 6 cabling does support the bi-directional transmission that we see in Gigabit Ethernet setups aka 1000BASE-T (1 gigabit is 1000 megabits per second!).

Signal-to-noise ratio performance advantages

Cat 6 cable provides a SNR (Signal To Noise) ratio that is approx 15 times better than Cat 5 cable over a large range of frequencies and compensates well for external ‘noise’ and temperature variations.

Popular applications for network cabling

Cat 6 has much better support for HD video, coping well with HD-SDI which demands up to 1.5 Gigabits per second. It can be used in any application that requires Cat 5 cabling such as till data, PC networks etc, so replacement of older Cat 5 cabling can be done with this newer cable as the end connectors (RJ45) are the same.  Do read my next paragraph for a caveat though.

Using Cat 6 cable with Cat 5 RJ45 plugs

The cabling is easy to terminate but watch out for the end connectors. Cat 5 RJ45 connectors are NOT the same as Cat 6 RJ45 connectors. This is a common mistake made by electrical wholesalers and even some suppliers. They don’t know the difference and often brand the end terminations as suitable for both Cat 5 and Cat 6 cabling. You won’t be able to fit Cat 6 into the old connectors because the inner cable diameter is usually that bit bigger. Stripping off the outer sheathing may help temporarily if you are in a fix, but this will usually break the integrity of the end connector as the plastic sheathing also helps to prevent the cable from pulling out. Before attempting a network installation, do a test run with your cable and end terminations.  The RJ45 plug will, however, fit in exactly the same socket so no need to change the wall plate, switch, hub, or device socket.

Ready made cables will definitely help the beginner out there as the connections are already made and there is often a moulded boot in place to support the cable and prevent excessive loads from pulling it out. Prices are often as cheap as making your own so go for these unless you need extra long lengths.
Hope this helps to straighten out the lack of information out there, please leave me a comment if you find this helpful.


BT Connect email settings for business broadband

email-settings-pop-imap-btconnect-outlookLots of my clients have had issues where they have been running happily for a long time on their BT Connect email accounts and now they have suddenly stopped sending or receiving email. The change has been due to BT switching over to using Office 365 which is essentially Microsoft Outlook Online.

Here are the settings you need to feed in to your email program to get it working again. These will work with Outlook, Thunderbird, Eudora, Outlook Express etc and also work with popular services such as Gmail, Yahoo and Hotmail.

Incoming Mail Settings:
pop.outlook.com
port 995
SSL applied/ticked

Outgoing Mail Settings:
smtp.outlook.com
port 587
SMTP authentication applied/ticked
TLS applied/ticked
Authentication – password

Where prompted for the username and password, use the full email address, eg [email protected]